Introduction
Many of the applications we need to build require a front end app that the user can interact with, and a back end application that handles the requests from the user. There are a lot of ways to build these applications, but the more unified you can build them the better it is for you as a developer. You can build an application with the front end in one repo, and the back end in another repo. We do this frequently at my company, and we experience significant benefits with the enhanced coordination between the two apps. However, I have found it to be easier in many ways when the apps are in the same repo and are able to share related pieces where it makes sense.
In this article, I'll discuss how to organize a project using best practices through an example project using Angular and NestJS for the front and back ends respectively, with Nx as the build tool. You'll see many of the benefits of the apps being close together and the benefits of sharing code where possible.
Before we get started though, make sure you have Node and Nx installed on your computer. We'll need both of these to build the application. In addition, I find that it's easiest to generate the libraries and applications using the Nx console extension for VS Code. Go ahead and install that as well before continuing on. Nx console provides a great UI for generating many parts of your Angular and NestJS applications.
Creating the Workspace
Now that you have the setup done, it's time to create the workspace. There are a couple ways to do this, but I'm going to show you the way we have discovered works best. We'll create the workspace with the NestJS api first, and then add the Angular app after that.
Create the API
Nx has many starters for creating workspaces. Like I said above, there's more than one way to do it, but the way I'll show here is by creating the workspace with the NestJS app initially. You can do that with the following command:
npx create-nx-workspace@latest workspace-nameThe
workspace-namewill be the name of the folder on your computer, and the name of the workspace. I recommend not giving it the same name as your API or Angular app, but that's just to limit confusion. You can give it whatever name you would like. So if you're building Acme Corp's scheduling application, name the workspaceacme-scheduling-workspace. This will limit confusion between the name of the app and the name of the repo.
After running this command, you will be presented with some choices in the terminal. When asked which backend you would like to use,select the “Node” option. After making that selection, you'll be asked to select the framework you'd like to use. Any of the options are great options, but for this demo I'll be selecting NestJS. Nest is a great TypeScript based Node framework that will make Angular developers feel right at home. By default, Nest is built on Node, but it gives you the option to use Fastify if you prefer. The next decision to make is if you want an integrated monorepo or a standalone project. Nx sets the workspace up differently based on your choice here. If you are planning on having multiple apps (Node, Angular, React, etc) in the workspace, then go ahead and select “Integrated Monorepo”. That's what we'll do for this demo. Next, name the API project for your app. In this example, we'll just call it “api”. The last two questions ask about creating a Dockerfile and if you'd like to set up Nx caching for the project. We won't be going over those in this demo, so it doesn't really matter what is selected.
After answering all the questions, the workspace will be created and dependencies installed. When it's done, change into the directory you created for the project. Your api app is located in the apps directory, and you can run it by running the nx serve api command. Now that you've created the workspace and the API, let's move on to adding Angular to the project.
Add Angular and an Angular App
Before you can generate the Angular app, you need to add the Nx Angular tools to your workspace. You can do this with a simple npm install command, npm i -D @nx/angular. This adds @nx/angular to the workspace's dev dependencies. After the install is complete, you can use the Nx Console extension to create the Angular app.
Click on the Nx logo on the VS Code sidebar to open the Nx Console UI.
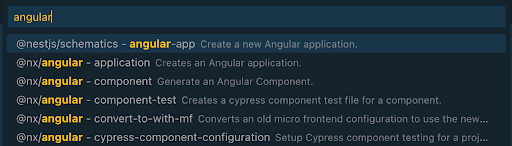
You should see a section that says “Generate and Run Target”, under which you can select generate. Clicking on this will open a menu at the top of VS Code. Type “angular” into the search box, and the results will be filtered for you. Look for the option that says “@nx/angular - application”. This will use Nx's provided generators to create an Angular application.
This will open up a UI that gives you many options to select for creating your Angular app. There are descriptions for each of them, but here are the ones I generally select:
- Name. Obviously we need to give our frontend app a name. For this demo, I selected frontend.
- Bundler. At the time of writing this article, you can select esbuild or webpack. I opted for esbuild, which is the default as of v17.
- Routing. Most apps need routing, and this was selected by default for me. I left it on.
- Standalone. This was also pre-selected.
- projectNameAndRootFormat. I like to change this from as-provided to derived. It doesn't change a lot, but the generated names for apps and libraries are easier to keep unique in my opinion with this setting.
- Directory. Make sure the app is generated in the apps directory. You will see dry run output in the VS Code console to help you confirm.
- e2eTestRunner. By default, Cypress is chosen, but you can change this to Playwright or none if desired.
- addTailwind. Select this if you want to use Tailwind. Packages will be installed and a config file generated.
- Style. You can select the file extension to be used for styles in your application.
Once you've selected all the options, you can click the generate button at the top of the UI. An end-to-end project is generated alongside the new Angular app, as long as you haven't selected “none” for the e2e test runner.
At this point we now have our API app created, and our Angular app created. These two will be the basis for our full stack app.
Libs in an Nx Workspace
Nx has a very prescriptive way of organizing an application. In a standard Angular app, you'll break the app up into feature modules. Nx is similar, but each feature module is a lib instead. They're generally separated into 4 types (though you could have more based on your use case if you wanted): feature, util, ui, and data-access. Furthermore, you would organize them by app, or put them in a shared folder if it would be shared between apps in the workspace.
This article won't go more into depth on the why of organizing the workspace, but I will mention where libraries are created and why I would create them there. If you want more info on organizing the workspace, check out the Nx docs.
Benefits of the Integrated Monorepo
Typing Your Apps
We now have an integrated monorepo set up, with an API and an Angular app. As we build the app out, we'll begin to add modules for the API and corresponding features to the Angular app. Naturally, we'll want the application to be typed. This is one of the biggest benefits of having the two apps in the same repo. If they were separated, you'd have to coordinate updates to the interfaces or classes when they change. This can be difficult and leads to inconsistencies in the types. In this setup though, we can eliminate this pain point.
Let's start by creating a new library in our workspace in a shared scope that will contain our interfaces, types, enums, and classes. Use the Nx Console extension to do this again. Open the generate UI like before, and select @nx/js - library. There should be nothing in here that's Angular specific, so we don't need an Angular library generated. Give the library a name, such as models or interfaces; something that makes sense to you. I've selected “models” for this demo. Select a unit test runner, and provide the directory where you want the library to be located.
We have found that it is best if we put all the libraries in a
libsfolder in the root of the app, and then in a folder that describes the scope of the library. In our demo, I'd have an api folder that contains all the API libs, a frontend folder for all the frontend libs, and a shared folder for all the shared libs.
With the library created, you can now start to add the types and models that you'll need in your app and shared between the front end and the backend. In many cases, they'll just be simple TypeScript interfaces or enums or even constants. Make sure to export them from the library's index.ts file so they can be referenced in other libraries as well. I borrowed a convention from .NET apps and added an “I” to the beginning of interfaces so I could easily identify them throughout the app.
Because the interfaces are shared, updating the interfaces becomes much more simple. If you need to rename an attribute, you can use the “Rename Symbol” function in VS Code. You'll be able to rename the attribute and it'll be automatically updated everywhere it's used throughout the app. If you need to add a required attribute, you can easily find all references to the interface and go manually add the new attribute. The bottom line is that your interfaces will stay in sync between the backend and the frontend of your application.
Entities and DTOs
Many NestJS apps have a database component, and a lot of them end up using TypeORM to set up the database connection and interactions. Your shared types will come in handy when setting up the DTOs and Entities for your apps as well.
When you create a new entity, for example, you can implement the interface, which will ensure that you add all the fields from the interface to the entity. Then, if you add to the interface later on, the IDE and TypeScript will tell you that you need to add that new attribute to the entity.
The same goes for the DTOs, but you can combine the interface with TypeScript Utility Types to build your DTOs. This comes in handy for “create” DTOs, for example. Take the following CreatePersonDto, which implements the IPerson interface.
export class CreatePersonDto implements Omit<IPerson, 'id'> {
  @ApiProperty({ description: "The person's first name" })
  @IsString()
  readonly firstName!: string;

  @ApiProperty({ description: "The person's last name" })
  @IsString()
  readonly lastName!: string;

  @ApiProperty({ description: "The person's email address" })
  @IsString()
  @IsEmail()
  readonly emailAddress!: string;

  @ApiProperty({ description: "The person's email address" })
  @IsString()
  readonly type!: PersonType;
}
On the first line, the IPerson interface is implemented, but the Omit utility type is also used so that we don't need to send an ID along on a create DTO. This makes sense because when we're creating a new person, we won't have an ID yet, so we don't provide it.
Util Functions
There are times when your applications need to share some utility functions between the front and back end of the app. In a separate repo setup, you'd have to duplicate the utility function in both repos, and each time you made a change you'd have to make it in both repos. In an integrated monorepo, the util function can be written once and used wherever it's needed. Any updates to the util function need only be made once.
For the placement of the utility functions, create a util library in the shared scope, and then export the functions from that lib.
Deployment
Deploying your apps from an Nx workspace is a nice developer experience as well. There are many services out there to deploy your app, and they'll do so automatically when you merge to your main branch. We'll look at a couple examples in a minute, but with both the frontend and backend apps in the same workspace, there's no worry about deploying the frontend and forgetting to deploy the API, for example. They will always be in sync.
Deploying the NestJS App
At its core, the NestJS app is just a node app, so you can deploy it wherever you'd like. Render.com is a great option, however. You can set the app up to automatically deploy on pushes to the main branch, and there's a generous free tier to get started on your project. It's nice to not have to pay for something when you're just getting started.
In addition to hosting the API app, Render can also host your Postgres database. Again, this is a really convenient service, and there's a generous free tier for the database hosting as well. On my last project, it took no more than a half an hour to get the database set up and the Nest app deployed. It's been deployed for about a month at the time of writing this article and I haven't had to pay yet (as we are not actually ready for an official deploy yet; we'll start paying at that time).
Deploying the Angular app
There are a lot of places to deploy an Angular app as well. My long-time favorite is Netlify. It's easy to set up, has a generous free tier, and is highly customizable. You can connect the GitHub repo so that it builds on pushes to the main branch, but it also automatically will do PR deploy previews for you. You can also set up form submissions and analytics with relatively little effort.
Conclusion
Having the backend and frontend of your application in the same repo solves many problems that exist when the two are in separate repos. Code duplication is limited, and keeping things in sync is much easier. Nx is the perfect tool to manage these workspaces, and Nest and Angular are the perfect duo.